Problem: My video is 48000 Hz and I have a separate audio track at 44100 Hz that slowly moves out of sync with the video.
I’m working on editing a video of our Instructor Conference for ProTrainings. The video is very long, and the audio and video are different speeds and yet run the same length. I’ve spent that last couple of days trying to figure out this problem, and I finally came across an explanation that worked for me. So, now I’m going to share that solution with you. We’ll start with the post that helped me to find the solution. It was posted by someone called mpiper on the videohelp.com forums:
I am not sure what caused the problem, but here is a solution I have used for similar issues in the past. as long and the change is minor, no one will notice.
First, find a FRAME-ACCURATE marker on the video track at the start. Perhaps the start of the first word from the lead singer.
Then, find a second Frame-Accurate marker at the end of the video track.
Write down the EXACT time difference between the start and stop markers in minutes, seconds and frames.
Now, Find the exact same start and stop markers on the audio track.
Write down the exact time for it as well, also in minutes, seconds and frames.
Now, divide the time of video by the time of audio to see the difference. For a simple example: 5.25 minutes for video and 5.0 minutes for audio gives a difference of 1.05 or 5% longer video. (I normally convert everything into total frames and use 9440 / 8991 = 1.0499 for 5% change!)
With this difference, change the speed of the audio (or video) by that percentage so they are exactly the same length. Now you have a match!
With Premiere Pro, you can stretch and shrink time on audio and there is a checkmark to maintain pitch, so everything sounds perfect.
Solution: Now I’ll explain exactly how to do this with Adobe Premiere Pro.
The first thing that I did was I took the 44.1 kHz mp3 files into Adobe Audition and resampled them to 48000 kHz wav files. I’m not sure how necessary this step turned out to be, because it didn’t alter the speed of the vocals in the video at all, but when I accomplished the sync, it was with the files I had made with this.

I made sure to line up the audio file with the audio that is in the video. That’s given, but I figured it was worth mentioning for the sake of completion.
 Quick Tip: When you are filming, if you can do so, I recommend using a clap board to mark the start of a shot, and if you regularly run into this issue, also do the same at the end of the shot before you stop all of the recording devices. This can be very helpful in lining up the audio when using multiple cameras and recording audio separately.
Now, what we’re going to do is pretty simple.
First, start with the timecode, hold Control and click it until it becomes a solid number. This is the frame number.

Next, we’re going to make sure that the frame number lines up on any and all audio tracks that you’re trying to line up, toward the beginning of the track, and put a marker there. Make sure to write down the number of the frame that you have set the marker at. In my case that is frame 16181.

After that, we’re going to head down to the end of the audio and video that you’ve lined up on the timeline. Find a keyword or the clapboard marker on the timeline, toward the end of the files and mark each with a marker in the same way as before. Take down each frame number. In my case, these numbers were 66139 for the video’s audio timecode and 66163 for the separate audio file.

Next it’s time to do some simple math.
We’re going to subtract the first frame number from each of the second frame numbers.
66139 – 16181 = 49958
66163 – 16181 = 49982
That’s not a very big difference. In fact, in my case it’s only 24 frames different, but that makes up nearly a second of audio.
We’re doing to divide the frames to get a percentage.
49982 / 49958 = 1.000480403538973
Important: Move the decimal two spaces to get the percentage: 100.0480403538973%
That means we have to change the speed of the separate audio file by 100.0480403538973%. This will then appear as 100.05% if you look at it again.

Now the audio should be lined up between the video and the separate audio file. On mine, after it all lined up, for whatever reason, I had to grab the end of it and stretch it all the way to the end, but everything stayed put and was perfectly aligned.

Now, play back your audio with all of the tracks turned on and marvel at the synchronized sound. Turn off the audio tracks connected to the video, and leave the clean separate audio file, and you’re good to keep editing at will.
Let me know if you have any questions. I hope this helps you as much as it’ll help me in the future when I run into this again.
Thanks to all of the people that attempted to give me a hand with this.
Update: Recently, we filmed a new program which included about 30 or so videos on Pet First Aid. We shot the entire program at 48000 Hz for the video, and 44100 Hz for the audio. We’re talking hundreds of takes, and using the above technique would have added a ton of time to the project. While the above technique is free, the opportunity cost far outweighed the cost of software that could do the same thing.
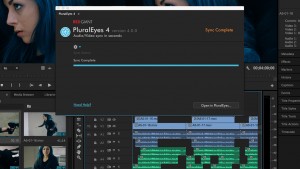
To correct it all, quickly, I used PluralEyes. At first, I tried the entire project, but it doesn’t work so well to do that. PluralEyes works best with a lower number of files. I wound up sorting this particular program by section of videos (we hadn’t yet sorted down to individual topics). On other projects, I sort down to individual videos and then run them through PluralEyes.
What it does is take all of the video from as many cameras as you used, plus the audio, and lines it up for you. You can then export to Premiere Pro (as well as other video editing software). It also creates new audio files that are labeled “drift corrected.” That’s right. PluralEyes changed the 44100 Hz audio to match the 48000 Hz video… in seconds… automagically!
After that, I import the file exported from PluralEyes, and use the timeline from that export as my video/audio source, that I copy from. Get PluralEyes and be amazed!
 Last fall, we filmed a new program which included about 30 or so videos on Pet First Aid. The program is going to be released within the next month or so. We shot the entire program at 48000 Hz for the video, and 44100 Hz for the audio. We’re talking hundreds of takes, and using the above technique would have added a ton of time to the project.
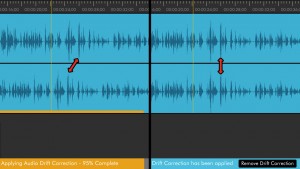 What it does is take all of the video from as many cameras as you used, plus the audio, and lines it up for you. You can then export to Premiere Pro (as well as other video editing software). It also creates new audio files that are labeled “drift corrected.” That’s right. PluralEyes changed the 44100 Hz audio to match the 48000 Hz video… in seconds… automagically!


